ATTENTION YOUTUBERS, BLOGGERS

ATTENTION YOUTUBERS AND BLOGGERS :
YOU ARE NOT ALLOWED TO COPY THE TUTORIALS FROM THIS BLOG AND PRODUCE THEM AS YOUR OWN WHETHER ON PRINT OR ELECTRONIC MEDIA OR SHOW THEM ON YOUR BLOGS OR YOUTUBE CHANNELS.YOU ARE ALLOWED TO SHOW THE FINISHED WORK BUT PLEASE LINK BACK TO THIS BLOG FOR THE TUTORIALS.IF FOUND COPYING, I WILL REPORT YOU TO YOUTUBE AND ADSENSE.

Saturday, November 6, 2010

Mirror work 1 (fly stitch petals)

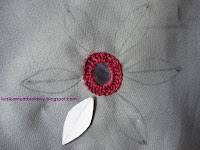
 1.Fix the mirror onto the fabric with basic stitches (the tutorial is given here). Make a template of a petal and use this to draw petals around the mirror.


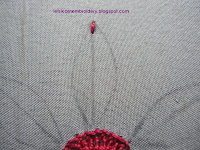
2.Make a small straight stitch at the tip of one of the petals.


 3.Bring the needle up at the point shown in the picture.Pull through.


4.Go in on the right and bring the needle up at the middle line, where you've made the straight stitch.


5.With the thread wrapped under the needle, pull through..Make a small stitch as shown.


6.The first fly stitch made.


7.The second fly stitch.


8.Continue till the petal has been filled up and proceed with the other petals.


Posted by Picasa

Friday, November 5, 2010

Mirror work (basic)

The mirror that I've shown here is 1.5cm in diameter.If you don't have mirrors, fill a circle with gold or silver fabric paint and when it is dry, follow the instructions given below.You can even fill it with sequins, beads or french knots.These are the basic stitches for mirror work:

1.Make 4 straight stitches on the mirror as shown here.


2.Make 4 diagonal stitches as shown.


3.Bring the needle up at any point close to the mirror.Pull through.


4.Go over and come under the basic stitches and with the thread wrapped under the needle, pull through.


5.As you pull the thread, go down the fabric at the position shown and bring the needle up at a point close to it.


6.With the thread wrapped under the needle, pull through.


7.Repeat step 4.


8.Repeat steps 5 & 6.In this picture, I've shown the position where the needle should go in before coming out at a point close to it (click on the picture to enlarge it).Ignore the loop you see on top because here, I haven't completely pulled the thread after step 4.


9.This is how it should look like in the end.

Saturday, October 16, 2010

Double cast-on leaves

To make double cast-on leaves, follow the instructions given for double cast-on stitch

.
You can make the leaves individually, or in clusters of two or three or even make a big leaf by stitching double cast-on stitch close to each other.By stitching this in a cluster of three, a calyx can be made.To make the leaf on the far left, first draw the outline of the leaf.Then fill it with double cast-on stitch, beginning with the tip (stitch no:1).This is followed by 2, then 3.Continue alternating between left and right till the leaf has been filled up.

Double cast-on six-petal flower


To make this double cast-on six-petal flower I've used Anchor pearl cotton no:8 thread.Please follow these instructions:

1.Divide a 1.75cm circle into six.
2.On the cloth, mark the mid-point and the six points on the circle.
3.Thread the needle, meet the 2 ends of thread and make a knot.
4.Bring out the needle at mid-point, pull through.
5.Go down at one of the points on the circle and bring it up at the mid-point or at a point close to it.Don't pull through.
6.Follow the instructions on how to make double cast-on stitch (I needed six loops to make a petal).
7.Continue with the other petals.
Posted by Picasa

Friday, October 15, 2010

Double cast-on sunflower

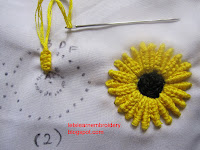
For this double cast-on sunflower, I've used six-strand embroidery floss.To prevent this thread from losing its lustre, cut length of thread needed to make one petal at a time.use fresh thread for each petal.Extra care should be taken when pulling the thread so that it won't become tangled.These are the instructions to make double cast-on sunflower:

1.Draw a 4cm diameter circle.
2.Draw a smaller 1.25cm diameter circle in the first circle.
3.Divide the small circle into 24 parts.
4.Divide the big circle into 24 parts in a manner that the mid-point, the point on the small circle and the point on the big circle are on a straight line.
5.Transfer the points onto a fabric.
6.Bring the needle up at A.pull through.
7.Go down at B and come up at A or a point close to A.Don't pull through.
8.Follow the instructions on how to make double cast-on stitch.
 9.After AB, go to EF and back to CD (so that the petals will be overlapping).Continue in this manner for the rest of the petals.
10.Fill the center with french knots or beads.


Wednesday, October 13, 2010

Double cast-on daisy

For this double cast-on daisy, I've used Anchor pearl cotton no:8 thread.

1.To make double cast-on daisy, draw a 3cm diameter circle.
2.Draw a smaller 0.75cm diameter circle in this circle.
3.Divide the small circle into 12 parts.
4.Divide the big circle into 12 parts in a manner that the mid-point, the point on the small circle and the point on the big circle are on a straight line.
5.Transfer the points onto a fabric.
6.Bring the needle up at A.Pull through.
7.Go down at B and come up at A or to a point close to A.Don't pull through.
8.Follow the instructions on how to make double cast-on stitch (I needed 12 loops to make a petal).
9.Continue with the other petals.
10.Fill the center with french knots or beads.

Sunday, October 10, 2010

Double cast-on stitch

Double cast-on stitch is a Brazilian embroidery stitch.2 strands of thread are used to wrap around the needle, one on the left, the other on the right.The loops are done alternately between left and right.Although Brazilian embroidery is done with special threads, I normally use Anchor Pearl Cotton no:8 thread or even the six strand embroidery floss.Here are the methods to make double cast-on stitch:

1.Thread the needle.Meet the ends of the thread and make a knot.
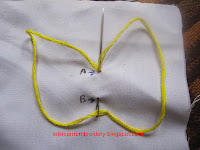
2.Bring up the needle atA.Pull through.
3.Go down at B.Without pulling through, come back at A or to a point close to A.
4.Place one thread on the left of the needle and the other one on the right.


5.Pick up the left thread, make a twist and drop the loop in the needle.Snug it down the needle.


6.Do the same with the thread on the right.Make sure the loops are done in the same manner.


7.Continue making the loops till the length of the loops is equal to the length of AB.


8.Hold the loops with one hand and with another hand, pull the needle through fabric and loops.Pull thread upwards and go towards B.


9.Hold the loops and carefully pull the remaining threads.At this point, you can pull both threads separately.Make sure they don't become tangled when being pulled through.


10.Bring the needle down at B.

This stitch can be used to make flower petals and leaves.
Saturday, October 9, 2010

Basic stitches

To learn the basic stitches of hand embroidery, please go to this wonderful website.