ATTENTION YOUTUBERS, BLOGGERS

ATTENTION YOUTUBERS AND BLOGGERS :
YOU ARE NOT ALLOWED TO COPY THE TUTORIALS FROM THIS BLOG AND PRODUCE THEM AS YOUR OWN WHETHER ON PRINT OR ELECTRONIC MEDIA OR SHOW THEM ON YOUR BLOGS OR YOUTUBE CHANNELS.YOU ARE ALLOWED TO SHOW THE FINISHED WORK BUT PLEASE LINK BACK TO THIS BLOG FOR THE TUTORIALS.IF FOUND COPYING, I WILL REPORT YOU TO YOUTUBE AND ADSENSE.

Saturday, June 25, 2011

Up-and-down flower


This up-and-down flower is easy to do, since the petals are done continuously, not individually.


Divide 2 circles into 6 (the big one is roughly 3cm diameter, smaller one is 1cm diameter).Position the points as shown above. Make small stitches on the points.


Beginning from one base, bring the thread up and insert the thread into the stitches done, alternating up and down to form a six-petal flower.


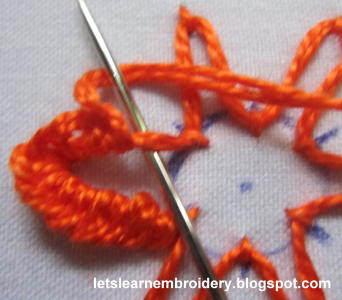
Bring the needle up at the base of one of the petals and make buttonhole knots continuously to cover the 6 petals. If you ran out of thread, stop at the base, not tip and continue from the same point.


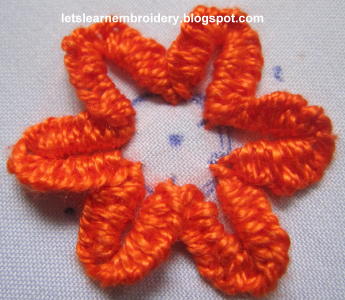
This flower is easy to embroider since you don’t have to make individual petals.


Tuesday, June 21, 2011

Pointed-tip buttonhole-knot flower

In my previous tutorials, I've shown you on how to make flowers using buttonhole-knot technique.I discovered that when the knots were worked continuously, what we get were rounded-tip petals.I did some experiments, and came up with this pointed-tip flower, which can also be used to make leaves.


With 2 strands of thread, make a straight stitch, from A to B.Come back at A, between the 2 strands of thread and start making buttonhole knots on the thread on the left.Cover the whole distance, from A to B.Enter the fabric at point C, which is a few mm above point B.Come back at A and continue on the thread on the right side.


Enter the fabric at the same point as before (point C).


Continue with the other petals.


These leaves were made the same way, but rather than covering the whole distance from A to B, stop making buttonhole knots a few mm away from B and enter the fabric at point B itself.Then, come back at A and continue the process.
For leaves, you don't necessarily have to make equal number of knots on both sides, and you don't necessarily have to enter the fabric the second time at B.The point where you enter the fabric for the second time will determine the shape of your leaf.Do some experiments of your own to create the leaves that you desire-whether pointing upwards, slanting to the left or right, or even curl at the tip.For some leaves, start with the left thread, for others start on the right. 
Posted by Picasa

Loop flower

This flower is made by making buttonhole knots on loops.It looks almost like a single cast-on flower.


With the help of a pencil,make a loop.Enter the fabric and secure each loop with a small stitch.


Make buttonhole knots to cover the whole loop.


I've made this petal with 16 strands of golden thread.It wasn't easy but the result was amazing.


Here, I've filled the center with 3-D glitter glue.
Posted by Picasa

Double buttonhole-knot flower

I made this flower on both sides of the petal, hence naming it double buttonhole-knot flower.


Make a straight stitch from A to B with 2 strands of thread.Bring the needle up at A, between the 2 threads and start making buttonhole knots on the thread on the left, from A to B.


Make the knots continuously on the thread at the right, from B to A.


A completed double buttonhole-knot flower.

Posted by Picasa

Friday, June 3, 2011

Single buttonhole-knot flower

I call this, single buttonhole-knot  because the knots are made only on one side of the petal.

Make a straight stitch from A to B (if you're using pearl cotton thread, 2 strands would be needed).Come back at A and start making buttonhole knots from A to B.


This is a single buttonhole-knot petal.


The flower on the left is made with Anchor pearl cotton no:8 thread, the one on the right with 6-strand embroidery floss.


Posted by Picasa

Buttonhole-knot lazy daisy

In this tutorial, I'm going to show how you  can transform a normal lazy daisy into a beautiful flower using buttonhole-knot technique.


Embroider a lazy daisy stitch.Bring the needle up at the base of the lazy daisy and start making buttonhole knots from one end to another.


This is the completed petal.Make sure that you make equal number of knots on both sides of the petal.And, also make sure you make enough knots to cover the whole lazy daisy or else the petal will curl.


This is the completed flower.If the flower curls too much, place a piece of cloth on your embroidery piece and press it with a hot iron.


Posted by Picasa