ATTENTION YOUTUBERS, BLOGGERS

ATTENTION YOUTUBERS AND BLOGGERS :
YOU ARE NOT ALLOWED TO COPY THE TUTORIALS FROM THIS BLOG AND PRODUCE THEM AS YOUR OWN WHETHER ON PRINT OR ELECTRONIC MEDIA OR SHOW THEM ON YOUR BLOGS OR YOUTUBE CHANNELS.YOU ARE ALLOWED TO SHOW THE FINISHED WORK BUT PLEASE LINK BACK TO THIS BLOG FOR THE TUTORIALS.IF FOUND COPYING, I WILL REPORT YOU TO YOUTUBE AND ADSENSE.

Sunday, August 28, 2011

Underwater scene 5


Today, I’m going to embroider the main character in this underwater scene-Miss Fish.
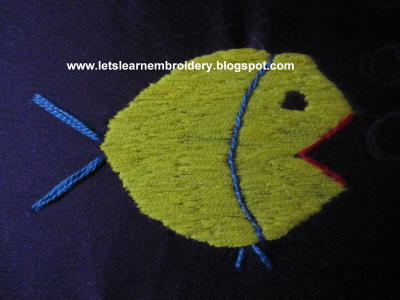

I’ve worked the head and body of this fish with long and short stitch, using 2 strands of the 6-strand embroidery thread. Then, I made straight stitches on the mouth with 6-strand thread and 2 tiny stitches at the bottom for the fins (2 strands of pearl cotton no:8 thread). For the tail, I’ve decided to embroider pointed buttonhole-knot stitch. For each part of the tail, I’ve made 2 straight stitches, close to each other (2 strands for each stitch).


As you can see here, I’ve made buttonhole knots on the straight stitches (6 strands for the lips, 2 strands for the tail and 1 strand for the fins). Work buttonhole/blanket stitch for the fin on top. The scales are v-shaped fly stitches.
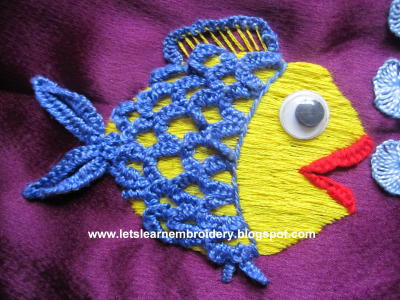

Work buttonhole knots on the fin with 2 strands (please refer frilled buttonhole stitch). The buttonhole knots on the scales were also done with 2 strands of thread. A googly eye completed the fish, and buttonhole wheels for the bubbles coming out of the fish’s mouth.


To view completed pattern, please click here.


Friday, August 12, 2011

Underwater scene 4


For the last item on the seabed, I’ve decided to embroider another coral.


For the body of this coral, I’m going to use weaving technique. Firstly, embroider 3 straight stitches close to each other. These stitches were held down with small stitches. Start weaving from the bottom, alternating from right to left.


And left to right. Push the thread down with the needle as you weave.


When the body is complete, embroider ‘Y-shaped’ fly stitches, as shown (I’ve used 2 strands of pearl cotton no:8 thread for this).


Cover the stitches with buttonhole knots (1strand).


Does this look like staghorn coral?


This is the completed seabed. Next, I will embroider a few sea animals.


To view completed pattern, please click here.

Thursday, August 4, 2011

Underwater scene 3


Last week was hard for me. I had to deal with a personal problem involving my son. He’s a kind-hearted, gentle-mannered boy. But, the problem is, he has this temper that’s beyond his control; something that he inherited from his father, my ex-husband. It would happen in a split second, causing him to become violent. When everything has cooled down, he would regret it. Since this incident happened in school last week, I had to go and talk to his teacher. Then, there was a trip to the psychologist. This problem has been going on since he was a child. Is there any help for this? I mean, the genetic factor plays a big role in this. I’m trying to make some changes to his life according to the psychologist’s advice. Hope that everything would turn out fine in the future. This incident really drained my energy, soul, everything. Please pray for me.
Continuing From where I left off, I would like to show you the slow progress that I’ve made so far.


This is the second starfish that I had embroidered.


As I was browsing my son’s encyclopedia, I came across an interesting coral. Since it looks like a brain, it’s called a ‘brain coral’. Although it’s round, I’ve changed the shape a bit. As you can see, the pattern curves up and down, left and right, without touching, till the end. In cake decoration, this is called ‘cornelli work’.


As usual, work small stitches on the pattern at the curved points. This is done with one strand of Anchor pearl cotton no:8 thread. Insert 2 strands of thread in these stitches. Work a small part at a time with 2 sets of needle and thread- one for the small stitches, the other to insert the thread.


This is the finished pattern. Next, work buttonhole knots on this pattern.


This is the final result.


To view completed pattern, please click here.

Sunday, July 24, 2011

Underwater scene 2


After completing the plants, I couldn’t wait to embroider a starfish. I’ve decided to use buttonhole stitch (blanket stitch) for this, worked with Anchor pearl cotton no:8 thread.


Divide each arm of the starfish into 2 parts and work buttonhole stitch from the mid-point, cover the whole right side to the tip. Make a small stitch at the tip before continuing.


Continue from the tip; cover the left side back to the mid-point. Work other arms the same way. I was in a dilemma, whether to leave the starfish as it is, or…….


Work buttonhole knots all around it as in the frilled buttonhole-knot stitch. This is not bad, is it? It looks like the starfish is swimming.


To view completed pattern, please click here.

Underwater scene 1

To begin with, I would like to thank Lakshmi Sadalas for sending lots and lots of visitors to my blog. For the past one week, I had been drawing and erasing, drawing and erasing…… You see, I wanted to embroider an underwater scene and since I’m not good at drawing, it took me many days to prepare a pattern. I had never done underwater embroidery before, so I just hope that this would turn out fine. I got the inspiration for this from Shirley’s blog. She paints and embroiders magnificent underwater scenes. Firstly, I’m going to embroider underwater plants, using buttonhole-knot technique. The tutorial for the leaves is given here.


For this first plant, I’ve used six strands for the small stitches used to hold and shape the threads. As I progressed with my work, I realized that I didn’t have enough thread to complete the leaves. That’s why the buttonhole knots were done with a different-coloured thread. As a result, the thread at the base could be seen here and there. So, please use the same colour for the whole work.


These are the completed leaves.


For the next plant, the small stitches were done with 2 strands of thread, the buttonhole knots with 6 strands. I think this is better.


 In my next post, I’ll show you how to embroider a starfish.


To view completed pattern, please click here.


Saturday, July 16, 2011

Buttonhole-knot rosebud 5

Another rosebud? …..Unfortunately, yes!


Embroider a pointed buttonhole-knot petal from A to B. Enter the fabric at C. Embroider another petal from D to E. Enter at the same point, C.


Work 2 single buttonhole-knot stitches for calyx.


Complete the calyx with 2 more stitches at both sides and at the base of the bud. The straight stitch is for the stalk.

Buttonhole-knot rosebud 4

I hope you’re not tired of my rosebuds, because……..here comes another one!


Embroider a pointed buttonhole-knot petal and flank both sides with single buttonhole-knot petals. The thread on the right seems loose because I wanted to show the position of the stitch. When you’re embroidering, make sure that it is not loose.


Here, I’ve filled the stitch with buttonhole knots.


Embroider calyx as shown. Make 3 straight stitches; one for the stalk, the rest for….(What do you call them? Sepals?)