ATTENTION YOUTUBERS, BLOGGERS

ATTENTION YOUTUBERS AND BLOGGERS :
YOU ARE NOT ALLOWED TO COPY THE TUTORIALS FROM THIS BLOG AND PRODUCE THEM AS YOUR OWN WHETHER ON PRINT OR ELECTRONIC MEDIA OR SHOW THEM ON YOUR BLOGS OR YOUTUBE CHANNELS.YOU ARE ALLOWED TO SHOW THE FINISHED WORK BUT PLEASE LINK BACK TO THIS BLOG FOR THE TUTORIALS.IF FOUND COPYING, I WILL REPORT YOU TO YOUTUBE AND ADSENSE.

Monday, October 24, 2011

Flower stitch


The following stitch could be used to embroider small flowers. Each petal consists of 3 lazy daisies stitched close to each other.


Embroider the first lazy daisy, on the left.


Rather than holding down the loop on the same point, enter the fabric at point A (this will be the tip of the flower).


Stitch another lazy daisy in the middle and enter at the same point, A.


This is the last stitch and one petal is made.


This is how the flower looks like. Each petal measures less than 1cm in length.


Thursday, October 20, 2011

Free pattern 1 - Underwater scene

This is the completed underwater scene pattern.


As you can see, this is only a simple pattern, measuring 10”x 10”. I just wanted to show the endless ways you could use buttonhole knots to create beautiful embroidery.
Please follow these links for step-by-step instructions:


Friday, October 7, 2011

Underwater scene 8


For the last sea creature for this underwater scene embroidery, my choice is a seahorse. For this, I’ve used pearl cotton no:8 thread.


I began at the tip of the tail. Here, I,ve made 2 rows of buttonhole/blanket stitch.


Then, slightly above the stitch, I made a horizontal bar (straight stitch). Work buttonhole knots on this bar, facing downwards. Continue making another bar and fill it with buttonhole knots. The bar in the picture is the third one.


Filled with buttonhole knots.


Here, I’ve almost completed the tail. That is the last bar. For the tip of the tail, I,ve used only one strand for the bars and buttonhole knots. As the tail became wider, I use 2 strands for both. At the end of the buttonhole knots on each bar, enter the fabric at a point a bit further to give the skin a spiked look. The fin was done with buttonhole/blanket stitch and a straight stitch for the mouth.


As you can see here, I’ve filled the stitches with buttonhole knots. For the fin, please refer frilled buttonhole stitch.


The body was divided into 3 parts. The first part has been filled the same way as the tail (2 strands). Work from bottom to top.


The second part has also been filled.


And, this is the final part. This fellow is my favourite.
I,ve come to the end of this underwater scene embroidery. I’ll show you the full pattern in my next post since I’ll have to stitch some more of the tiny fish that I’ve shown in my last post. From time to time, I’ll try to embroider more sea creatures.


To view completed pattern, please click here.

Saturday, October 1, 2011

Underwater scene 7


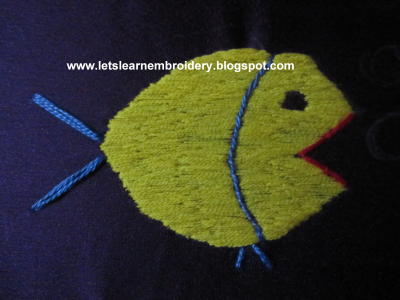
Today, I,m going to embroider another fish – smaller than the previous one.


For the head and body, I’ve used one strand from the 6-strand floss. Satin stitch for the head and long and short stitch for the body. I’ve also made 2 straight stitches at the bottom of the body for the fins (6 strands). The tail is buttonhole/blanket stitch (2 strands).


Here, I’ve covered the fins with buttonhole knots (3 strands) and worked buttonhole knots on the tail (2 strands). (Please refer frilled buttonhole stitch). Embroider tiny fly stitches (2 strands), close to each other for the fin at the top of the body. And, 2 curved lines on the body for the stripes (6 strands).


Work buttonhole knots on the curved lines and tiny googly eye to complete this fish. I’ll have to embroider a few more to show them swimming in a group.
I’m nearing the end of my underwater scene project. There’s still one more sea creature left. Can you guess what it is?


To view completed pattern, please click here.

Thursday, September 15, 2011

Underwater scene 6


If you’re wondering why I haven’t posted for quite a while – the reason is I’ve been spending more time with my son. As a stay-at-home single mom who works from home on my computer, I was always busy. Since we live in a farmhouse,there’s always one work or another. If he had noone to play with, my son would be glued in front of the T.V. or engrossed in his computer games. Although we lived under the same roof, we were in different worlds. Nowadays, I make it a point to spend more time with him. Rather than cooping up inside the house, I take him outdoors, cycling, watching our cow grazing, birds making nests, peacock’s dance or just take a walk in this beautiful countryside, enjoying the lovely sunrise, sunset, moon and stars.
For this to happen, I finish all my chores before he returns from school. I encourage him to go out and meet people. Slowly, he’s building his self-confidence. He enjoys the outdoors more than indoors. When he has noone to play with, I’ll join him. Normally, I would do my shopping and pay my bills when he was at school. But, nowadays I take him wherever I go. My advice to all mothers out there – be there for your children, not only physically but also mentally. Expose them to the outside world – take them to gatherings, weddings, funerals etc. Let them mingle with other children, rich or poor. Take a public transport with your children just for the fun of it – they will enjoy meeting people. Start all this at a young age. Believe me, I’ve seen the difference in my son in a very short period (one month). Not only that, I’m beginning to feel the difference in my life, as well.
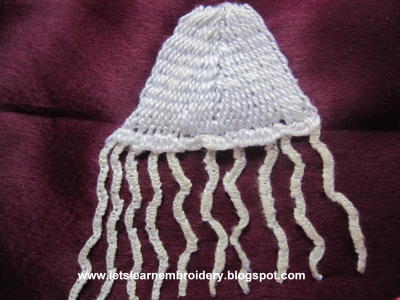
That’s my real world. Now to my virtual world – blogging. These days, I embroider only when he’s at school. To fill a vacant spot in my underwatwe scene, I’ve decided to stitch a jellyfish, though it wasn’t my favourite choice.


I started with the tentacles. I’ve made running stitch on each tentacle and then inserted one strand of pearl cotton no:8 thread into the stitch.


Here, I’ve made buttonhole knots on the thread with one strand from the six-strand thread. Work buttonhole/blanket stitch at the bottom of the body (pearl cotton no:8).Sorry for the quality of the picture.


With one strand of pearl cotton, work buttonhole knots on the buttonhole/blanket stitch (please refer frilled buttonhole stitch). Stitch horizontal bars on the body, as shown.


Bring the needle up at the top of the body, insert the needle under the first bar and pull the thread.


Continue downwards. This stitch is called ‘chebron stem filling stitch’. When you reach the bottom, enter the fabric.


To continue, come back at the top and repeat the process. After completing 2 columns at the left, I’ve decided to fill the right side. Please note the position of the needle.


This is the stitch in progress. Alternate between left and right. For convenience, use 2 sets of needle and thread.


Here, the body is halfway filled. As the whole top has been filled, bring the needle up at the position shown and continue to fill.


The whole body has been filled up. There’s a slight difference in the shades of white since 2 different types of threads were used.

To view completed pattern, please click here.


Sunday, August 28, 2011

Underwater scene 5


Today, I’m going to embroider the main character in this underwater scene-Miss Fish.


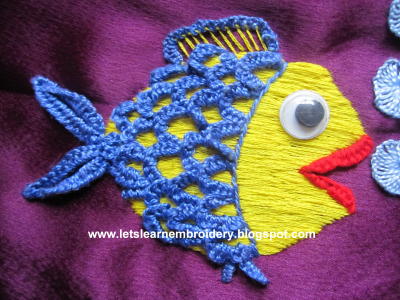
I’ve worked the head and body of this fish with long and short stitch, using 2 strands of the 6-strand embroidery thread. Then, I made straight stitches on the mouth with 6-strand thread and 2 tiny stitches at the bottom for the fins (2 strands of pearl cotton no:8 thread). For the tail, I’ve decided to embroider pointed buttonhole-knot stitch. For each part of the tail, I’ve made 2 straight stitches, close to each other (2 strands for each stitch).


As you can see here, I’ve made buttonhole knots on the straight stitches (6 strands for the lips, 2 strands for the tail and 1 strand for the fins). Work buttonhole/blanket stitch for the fin on top. The scales are v-shaped fly stitches.


Work buttonhole knots on the fin with 2 strands (please refer frilled buttonhole stitch). The buttonhole knots on the scales were also done with 2 strands of thread. A googly eye completed the fish, and buttonhole wheels for the bubbles coming out of the fish’s mouth.


To view completed pattern, please click here.


Friday, August 12, 2011

Underwater scene 4


For the last item on the seabed, I’ve decided to embroider another coral.


For the body of this coral, I’m going to use weaving technique. Firstly, embroider 3 straight stitches close to each other. These stitches were held down with small stitches. Start weaving from the bottom, alternating from right to left.


And left to right. Push the thread down with the needle as you weave.


When the body is complete, embroider ‘Y-shaped’ fly stitches, as shown (I’ve used 2 strands of pearl cotton no:8 thread for this).


Cover the stitches with buttonhole knots (1strand).


Does this look like staghorn coral?


This is the completed seabed. Next, I will embroider a few sea animals.


To view completed pattern, please click here.