ATTENTION YOUTUBERS, BLOGGERS

ATTENTION YOUTUBERS AND BLOGGERS :
YOU ARE NOT ALLOWED TO COPY THE TUTORIALS FROM THIS BLOG AND PRODUCE THEM AS YOUR OWN WHETHER ON PRINT OR ELECTRONIC MEDIA OR SHOW THEM ON YOUR BLOGS OR YOUTUBE CHANNELS.YOU ARE ALLOWED TO SHOW THE FINISHED WORK BUT PLEASE LINK BACK TO THIS BLOG FOR THE TUTORIALS.IF FOUND COPYING, I WILL REPORT YOU TO YOUTUBE AND ADSENSE.

Saturday, July 28, 2012

Flower stitch 3 - part 1


Today, I would like to show you a tutorial for another flower stitch which is a combination of buttonhole wheel and other stitches.I want to clarify here that ‘flower stitch’ is not the name of the stitch itself but rather a way of me listing stitches that look like flowers under this category.This flower is really simple to stitch.


Divide a 2.5cm diameter circle into 16.Draw a smaller, 1.25cm diameter circle in this circle.Work buttonhole/blanket stitch, as shown.


Insert the needle to the left of this stitch (at this point, you can even use a different coloured thread), bring the needle up and wrap the thread under the needle.


A lazy daisy stitch is made.


Continue in this manner till the end of the circle.


Here, Basque stitch was made on the buttonhole wheel.I’ll show you more examples in my next post.

Sunday, July 22, 2012

Basque stitch peacock


I wasn’t feeling well for the past few days, so I hope that I’m not too late for this week’s TAST challenge. Today, I’d stitched another peacock, this time using Basque stitch for the feathers.


The body is herringbone stitch.You can add as many layers of feathers but make sure that you work the topmost feathers first and then the layer below it and so on till you reach the bottom layer.This will make the layers overlapping beautifully.


This is another trial – a combination of buttonhole wheel and basque stitch, worked continuously.The tutorials for this and another one, done on shisha/mirror are coming soon!

Thursday, July 5, 2012

Mirror work 5


This week’s TAST challenge is bonnet stitch.When I saw this stitch worked in a circle on Sharon’s blog, I knew I had to try this on a mirror/shisha.When worked on a mirror/shisha, the stitch has to be worked close to each other.Below is the sunbonnet mirror work tutorial:

This mirrorwork is my own creation.You are not allowed to copy the tutorial and produce it as your own whether on print or electronic media, on your blog or youtube channels.You are allowed to show the finished work but please link back to this page for the tutorial.


Draw a 2.5cm diameter circle.Fix a mirror (1.25cm diameter) in the middle with straight and diagonal stitches.Bring the needle up near the mirror.Work a straight vertical stitch and come up at a point to the left of this stitch.


Bring the needle under the straight stitch.


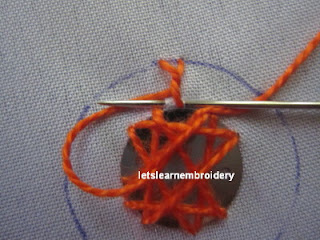
Bring the needle and thread over and under the foundation stitches, as shown.


Take a stitch from right to left at the position shown. (Please refer Sharon’s tutorial to understand this better)


Pull the thread (use equal tension all around to get beautiful, rounded center).Enter the needle in the same hole as the previous one and bring it up at the left.Wrap the thread under the needle and pull through.


Once again, bring the needle and thread over and under the foundation stitches.Continue as above.


You can see here that the loops at the base of the bonnet stitch are actually worked on the foundation stitches.


This is the position where you should end your stitch.


Mission accomplished!What do you think?

Sunday, July 1, 2012

No-stitch peacock


Today, I would like to share with you another simple peacock design.This peacock requires no stitching at all.


For this, you ‘ll need some rounded and teardrop shaped stones, 3-D glitter glue and fabric glue.


Arrange the stones to form the body of the peacock.3 teardrop shaped stones are needed for the head and wings.Stick each stone with fabric glue and draw the legs, using glitter glue.


Arrange and glue more teardrop shaped stones for the ‘eyes’ of the tail feather.


Using glitter glue, draw the tail of the peacock.Please excuse my drawing of the peacock feather – it was done in a hurry.I’m quite sure you can draw better than this.For those of you who don’t have glitter glue, you can even embroider the legs and tail.Hope you get the idea.I hope some of you will try this and leave your links in the comment box below.I have other ideas for this peacock.When I have the time, I’ll try and share them with you.